
aligner IPR visualisation
Aligner IPR Visualisation: Showing Interproximal Reduction Clearly
How aligner IPR visualisation shows interproximal reduction in 3D: values per contact, timing per aligner, and an IPR protocol doctors can follow.
· 4 min read · DentoSim
Interproximal reduction (IPR), often called stripping or enamel reduction, removes a small, controlled amount of enamel between neighbouring teeth to create space. In many clear aligner plans it is essential: it helps resolve crowding, adjust tooth size discrepancies and reduce the need for expansion or proclination.
Getting IPR right matters. The right amount, between the right teeth, before the right aligner. This article explains why aligner IPR visualisation in 3D makes that information far easier to follow than a table alone, and what a good IPR display should include.
How IPR is usually communicated
Traditionally, IPR is delivered as a table or a page in a PDF report: a list of tooth pairs, millimetre values and stage numbers. Some reports add a simple tooth chart with numbers between the teeth.
This information is accurate, but it has to be translated in the doctor's head: from tooth numbers to real teeth, from stage numbers to the aligner the patient is about to receive. At the chair, under time pressure, that translation is where mistakes can happen.
Why IPR needs to be visual
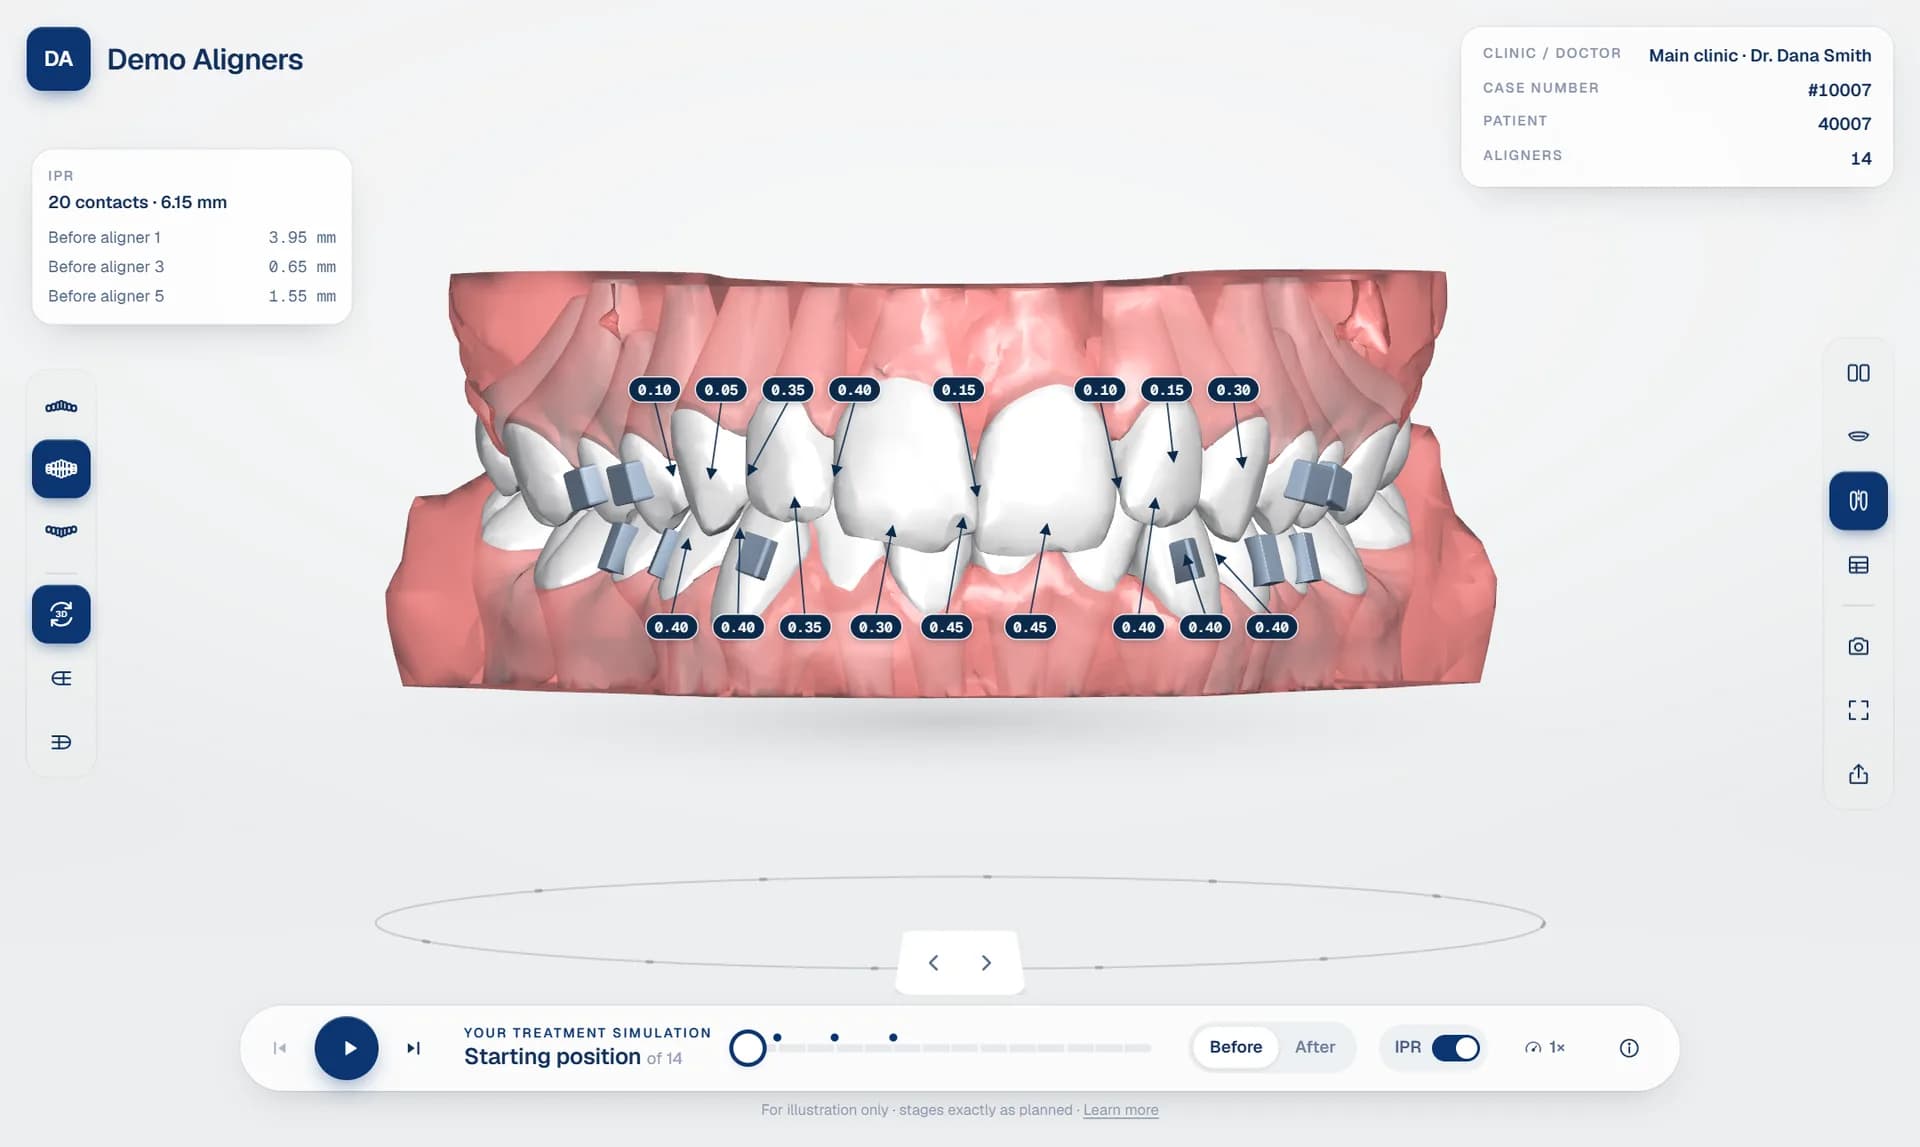
When the same information appears on the 3D model, with a value pointing at each contact, the doctor sees immediately where the reduction is and how it relates to the movement. They can rotate the model to look at the contact, see whether the space is closed later in treatment, and check the IPR against the crowding it is meant to resolve.
A visual display also makes it easier to spot anything unusual: IPR planned on a contact that already has a gap, an amount that looks large for that tooth, or reduction scheduled before the aligner where the teeth are actually separated.
What good IPR visualisation shows
- A value at each contact, in millimetres, with a clear arrow to the exact contact point.
- Upper and lower arches separately, with labels placed above the upper teeth and below the lower teeth, so they never overlap.
- The timing: which aligner each reduction should be done before.
- A summary of the protocol: the number of contacts, the total amount, and the amount at each step.
- Markers on the timeline, so the doctor can see at a glance which aligners have IPR due.
- An on/off switch, so the labels can be hidden when the doctor or patient just wants to watch the movement.
- Readable labels on a phone, rearranged into staggered rows when space is tight rather than overlapping.
The IPR protocol, aligner by aligner
A clear IPR protocol groups reductions by step. For example: before aligner 1, five contacts totalling 3.95 mm; before aligner 3, two contacts totalling 0.65 mm; before aligner 5, three contacts totalling 1.55 mm. Each step lists the contacts by arch, such as 13 | 12: 0.35 mm.
The doctor should be able to jump straight to the aligner where IPR is due and see those contacts on the model at that moment, with the rest of the plan in context. When the doctor is at an aligner with no IPR, the viewer can show when the next step is due.
Where the values come from
IPR values should come directly from the treatment plan, never from retyping. Many planning software exports include an IPR or stripping report alongside the 3D models, often listing the reduction on each surface of each tooth. A good simulation platform reads that report, adds the mesial and distal values at each contact, and places the total on the model automatically.
DentoSim reads IPR directly from the planning software's export where it is available, so the values in the viewer are the values in the plan.
Should patients see IPR?
Opinions differ. Some doctors prefer to explain IPR in person and keep the patient's view focused on the result. Others like the patient to understand in advance that there will be small adjustments between some teeth, so nothing comes as a surprise.
With an on/off switch, the doctor decides how to use it. During a consultation, the doctor can turn IPR on to explain where space will be created, then turn it off to show the final smile.
Practical tips for labs
- Check that IPR in the viewer matches your plan for the first few cases you upload to any new platform.
- Include IPR in your note to the doctor, for example "IPR before aligners 1, 3 and 5, total 6.15 mm".
- Keep consistent conventions for when IPR is scheduled, so doctors know what to expect.
- Review IPR on a phone as well as a desktop, since that is where many doctors will see it.
IPR alongside the movement table
IPR is one part of a bigger picture. The orthodontic tooth movement table shows mesial and distal stripping per tooth next to rotation, angulation and translation, so the doctor can see why the space is needed. Combined with attachments and smooth playback, it gives a complete view of the plan.
Try IPR visualisation, the IPR protocol card and the movement table in DentoSim's 3D aligner treatment viewer, or register your lab to see them on your own cases.
Frequently asked questions
What is IPR in aligner treatment?
Interproximal reduction: removing a small amount of enamel between teeth to create space for planned movements. It is planned per contact and per aligner.
Where do the IPR values come from?
From the treatment plan. DentoSim reads IPR from the planning software's export where it is included, so the values match the plan.
Can IPR labels be hidden?
Yes. An IPR switch shows or hides the labels and the IPR protocol card.
How is IPR shown on a phone?
Labels are arranged in staggered rows above the upper teeth and below the lower teeth, so they stay readable without overlapping.
See it on your own treatment plans
DentoSim turns aligner treatment plans into 3D simulations for doctors and patients, under your lab's brand.